Setting up a MacBook Pro for the first time is a ritual that allows new perspectives to shine. This is my first time using a MacBook Pro for software development and I got to say that the machine is a powerhouse! Like in any relationship, It's always exciting in the beginning. I'm mostly focused on .NET and Kubernetes, however, this guide applies to everyone that does development (and, IMO, some QoL improvements for Mac users in general). I've had this MacBook Pro for a month, and these are some of the configurations and adjustments I've made to make my development workflow a bit easier.
Adjustments to System Settings
“It just works” might have been Apple’s slogan, but sometimes things need a little fine-tuning to really work for developers. With the right tweaks and setups, the MacBook Pro turns into a productivity powerhouse.
Keyboard
• Key Repeat: Set to Fastest.
• Delay Until Repeat: Set to Short.
#!/bin/bash
defaults write NSGlobalDomain KeyRepeat -int 2
defaults write NSGlobalDomain InitialKeyRepeat -int 15
Shortcuts
• Disable F11 shortcut for “Show Desktop” (conflicts with IDEs like Rider).
• Add shortcuts for switching desktops:
• ^1, ^2, ^3, ^4 to switch to Desktops 1–4.
• Enable Standard Function Keys (F1–F12 without requiring Fn).
• Disable Spotlight shortcut (replaced with Raycast).
#!/bin/bash
# Disable F11 for "Show Desktop"
defaults write com.apple.symbolichotkeys AppleSymbolicHotKeys -dict-add 32 "{enabled = 0;}"

# Add shortcuts for switching desktops
defaults write com.apple.symbolichotkeys AppleSymbolicHotKeys -dict-add 118 "{enabled = 1; value = { parameters = (49, 65535, 262144); type = standard; }; }"
defaults write com.apple.symbolichotkeys AppleSymbolicHotKeys -dict-add 119 "{enabled = 1; value = { parameters = (50, 65535, 262144); type = standard; }; }"
defaults write com.apple.symbolichotkeys AppleSymbolicHotKeys -dict-add 120 "{enabled = 1; value = { parameters = (51, 65535, 262144); type = standard; }; }"
defaults write com.apple.symbolichotkeys AppleSymbolicHotKeys -dict-add 121 "{enabled = 1; value = { parameters = (52, 65535, 262144); type = standard; }; }"

# Enable standard function keys
defaults write -g com.apple.keyboard.fnState -bool true

# Disable Spotlight shortcut
sudo launchctl unload -w /System/Library/LaunchAgents/com.apple.Spotlight.plist
Dock
• Size: Set to Small.
• Magnification: Disabled.
• Auto-hide: Enabled.
• Recent Apps: Disabled (remove suggested and recent apps).
#!/bin/bash
# Adjust Dock settings
defaults write com.apple.dock tilesize -int 36  # Small Dock size
defaults write com.apple.dock magnification -bool false  # Disable magnification
defaults write com.apple.dock autohide -bool true  # Enable auto-hide
defaults write com.apple.dock show-recents -bool false  # Disable recent apps
killall Dock  # Apply changes
Windows
- Prefer tabs when opening documents: Set to Always. (Rider and vscode opens solutions/folders in the same window)

#!/bin/bash
# Set "Prefer tabs when opening documents" to "Always"
defaults write -g AppleWindowTabbingMode -string "always"
Trackpad
• Tap to Click: Enabled.
#!/bin/bash
# Enable Tap to Click
defaults write com.apple.AppleMultitouchTrackpad Clicking -bool true
defaults write com.apple.driver.AppleBluetoothMultitouch.trackpad Clicking -bool true
Appearance
• Set to Dark Mode.
Display
• Laptop screen scaling: More Space.
Network
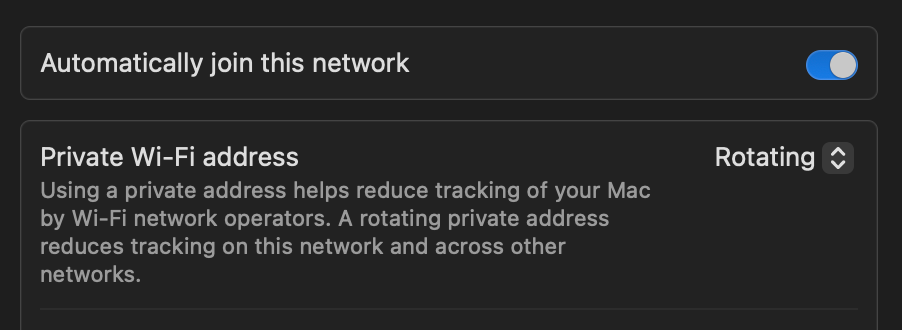
• Enable Rotating Private Wi-Fi Address: Reduces tracking on the connected network.

Finder
The default Finder in MacOS is not optimal and can easily be altered with a few adjustments. Credits to https://github.com/mathiasbynens/dotfiles/blob/master/.macos.
defaults write com.apple.finder QuitMenuItem -bool true

# Finder: disable window animations and Get Info animations
defaults write com.apple.finder DisableAllAnimations -bool true

# Set Desktop as the default location for new Finder windows
# For other paths, use `PfLo` and `file:///full/path/here/`
defaults write com.apple.finder NewWindowTarget -string "PfDe"
defaults write com.apple.finder NewWindowTargetPath -string "file://${HOME}/Desktop/"

# Show icons for hard drives, servers, and removable media on the desktop
defaults write com.apple.finder ShowExternalHardDrivesOnDesktop -bool true
defaults write com.apple.finder ShowHardDrivesOnDesktop -bool true
defaults write com.apple.finder ShowMountedServersOnDesktop -bool true
defaults write com.apple.finder ShowRemovableMediaOnDesktop -bool true

# Finder: show hidden files by default
defaults write com.apple.finder AppleShowAllFiles -bool true

# Finder: show all filename extensions
defaults write NSGlobalDomain AppleShowAllExtensions -bool true

# Finder: show status bar
defaults write com.apple.finder ShowStatusBar -bool true

# Finder: show path bar
defaults write com.apple.finder ShowPathbar -bool true

# Display full POSIX path as Finder window title
defaults write com.apple.finder _FXShowPosixPathInTitle -bool true

# Keep folders on top when sorting by name
defaults write com.apple.finder _FXSortFoldersFirst -bool true

# When performing a search, search the current folder by default
defaults write com.apple.finder FXDefaultSearchScope -string "SCcf"

# Disable the warning when changing a file extension
defaults write com.apple.finder FXEnableExtensionChangeWarning -bool false

# Use list view in all Finder windows by default
# Four-letter codes for the other view modes: `icnv`, `clmv`, `glyv`
defaults write com.apple.finder FXPreferredViewStyle -string "Nlsv"

# Disable the warning before emptying the Trash
defaults write com.apple.finder WarnOnEmptyTrash -bool false

# Show the ~/Library folder
chflags nohidden ~/Library && xattr -d com.apple.FinderInfo ~/Library

# Show the /Volumes folder
sudo chflags nohidden /Volumes

# Expand the following File Info panes:
# “General”, “Open with”, and “Sharing & Permissions”
defaults write com.apple.finder FXInfoPanesExpanded -dict \
        General -bool true \
        OpenWith -bool true \
Terminal
Enable Touch ID for sudo in Terminal
Using Touch ID for sudo operations is a real time saver and easily set up with a few commands.
sudo su -
sed "s/^#auth/auth/" /etc/pam.d/sudo_local.template | sudo tee /etc/pam.d/sudo_local
Install Homebrew package manager
HomeBrew is the "de facto" package manager for MacOS. It manages package upgrades and installs apps without dragging them to the application folder.
/bin/bash -c "$(curl -fsSL https://raw.githubusercontent.com/Homebrew/install/HEAD/install.sh)"
Some good applications that I've installed with brew.
brew update

brew install brave-browser
			\ git
			\ gitkraken
			\ dotnet
			\ kubernetes-cli
			\ fluxcd/tap/flux
			\ azure-cli
			\ btop
			\ bat
			\ k9s
			\ obsidian
			\ fastfetch
			\ nvm
			\ neovim
			\ battery

brew install --cask kitty
			\ rider
			\ spotify
			\ azure-data-studio
			\ visual-studio-code
			\ bitwarden
			\ slack
			\ postman
			\ docker
			\ raycast
			\ linearmouse
			\ font-fira-code-nerd-font
			\ hiddenbar
Here are brief descriptions for each of the applications:
- brave-browser: A privacy-focused web browser that blocks ads and trackers by default.
- git: A version control system for tracking code changes, widely used in software development.
- gitkraken: A cross-platform Git GUI client with a user-friendly interface for managing repositories.
- dotnet: The .NET SDK, used for developing cross-platform applications with .NET and C#.
- kubernetes-cli: The command-line tool (kubectl) for interacting with Kubernetes clusters.
- fluxcd/tap/flux: The FluxCD CLI is a GitOps toolset.
- azure-cli: A command-line interface for managing Azure resources and services.
- btop: An advanced system resource monitor with a user-friendly, colorful terminal interface.
- bat: A modern replacement for cat with syntax highlighting and Git integration.
- k9s: A terminal-based UI for managing Kubernetes clusters interactively.
- obsidian: A powerful knowledge base and note-taking app with Markdown support.
- fastfetch: A highly optimized system information tool, similar to Neofetch, designed to quickly display detailed hardware and software information with customizable ASCII art in the terminal.
- nvm (Node Version Manager): A command-line tool that allows users to install, manage, and switch between multiple versions of Node.js easily.
- neovim: A modern, extensible, and performant fork of Vim, designed for efficient text editing and enhanced customization.
- battery: App that limits the maximum charge to 80% and helps to improve the battery health.
Cask Installs:
- kitty: A fast, feature-rich, GPU-based terminal emulator.
- rider: A cross-platform .NET IDE by JetBrains, supporting C# and web development.
- spotify: The desktop app for streaming music from the Spotify library.
- azure-data-studio: A data management and analytics tool for SQL Server and Azure SQL Database.
- visual-studio-code: A lightweight, extensible code editor with support for various programming languages.
- bitwarden: A secure, open-source password manager for storing and accessing credentials.
- slack: A collaboration and messaging app for team communication and file sharing.
- postman: A comprehensive tool for developing, testing, and debugging APIs.
- docker: A platform for developing, shipping, and running containerized applications.
- raycast: A replacement for spotlight, but also tools for window management and copy-paste management.
- linearmouse: A macOS utility that allows for precise customization of mouse settings, including scroll direction, acceleration, and speed adjustments.
- hiddenbar: Helps declutter my status bar.
Oh-my-zsh and Powerlevel10k
Install oh-my-zsh with the following command.
sh -c "$(curl -fsSL https://raw.githubusercontent.com/ohmyzsh/ohmyzsh/master/tools/install.sh)"
Install Powerlevel10k with
brew install powerlevel10k
echo "source $(brew --prefix)/share/powerlevel10k/powerlevel10k.zsh-theme" >>~/.zshrc
Use Kitty as Terminal emulator
Kitty is my favorite terminal emulator. It's lightweight, straightforward and feature-full.
Configure with code ~/.config/kitty/kitty.conf. I configured it with some fancy blur effect and used the Fira Code Nerd Font.
background_opacity 0.6
background_blur 60
font_family FiraCode Nerd Font Mono
font_size 14
Alternatively one can choose Warp which is a good-looking, block-based terminal.
Set up Git
Git profile
code ~/.gitconfig
Add your profile
[user]
name = Karl Solgård
email = karl@solgard.solutions

[github]
user = CosX

[push]
autoSetupRemote = true
SSH for RSA and ed25519
ssh-keygen -t rsa -b 4096 -C "karl@solgard.solutions"
ssh-keygen -t ed25519 -C "karl@solgard.solutions"
ssh-add --apple-use-keychain ~/.ssh/id_rsa
ssh-add --apple-use-keychain ~/.ssh/id_ed25519
Add the appropriate SSH public keys to your respective Git provider. Mine are Github and Azure DevOps.
Set up .NET for development
Set default environment variables
Inside the .zshrc:
export ASPNETCORE_ENVIRONMENT="Development"
export ASPNETCORE_URLS="https://localhost:5001"
Create and trust development certifications
Use HTTPS locally:
dotnet dev-certs https --trust
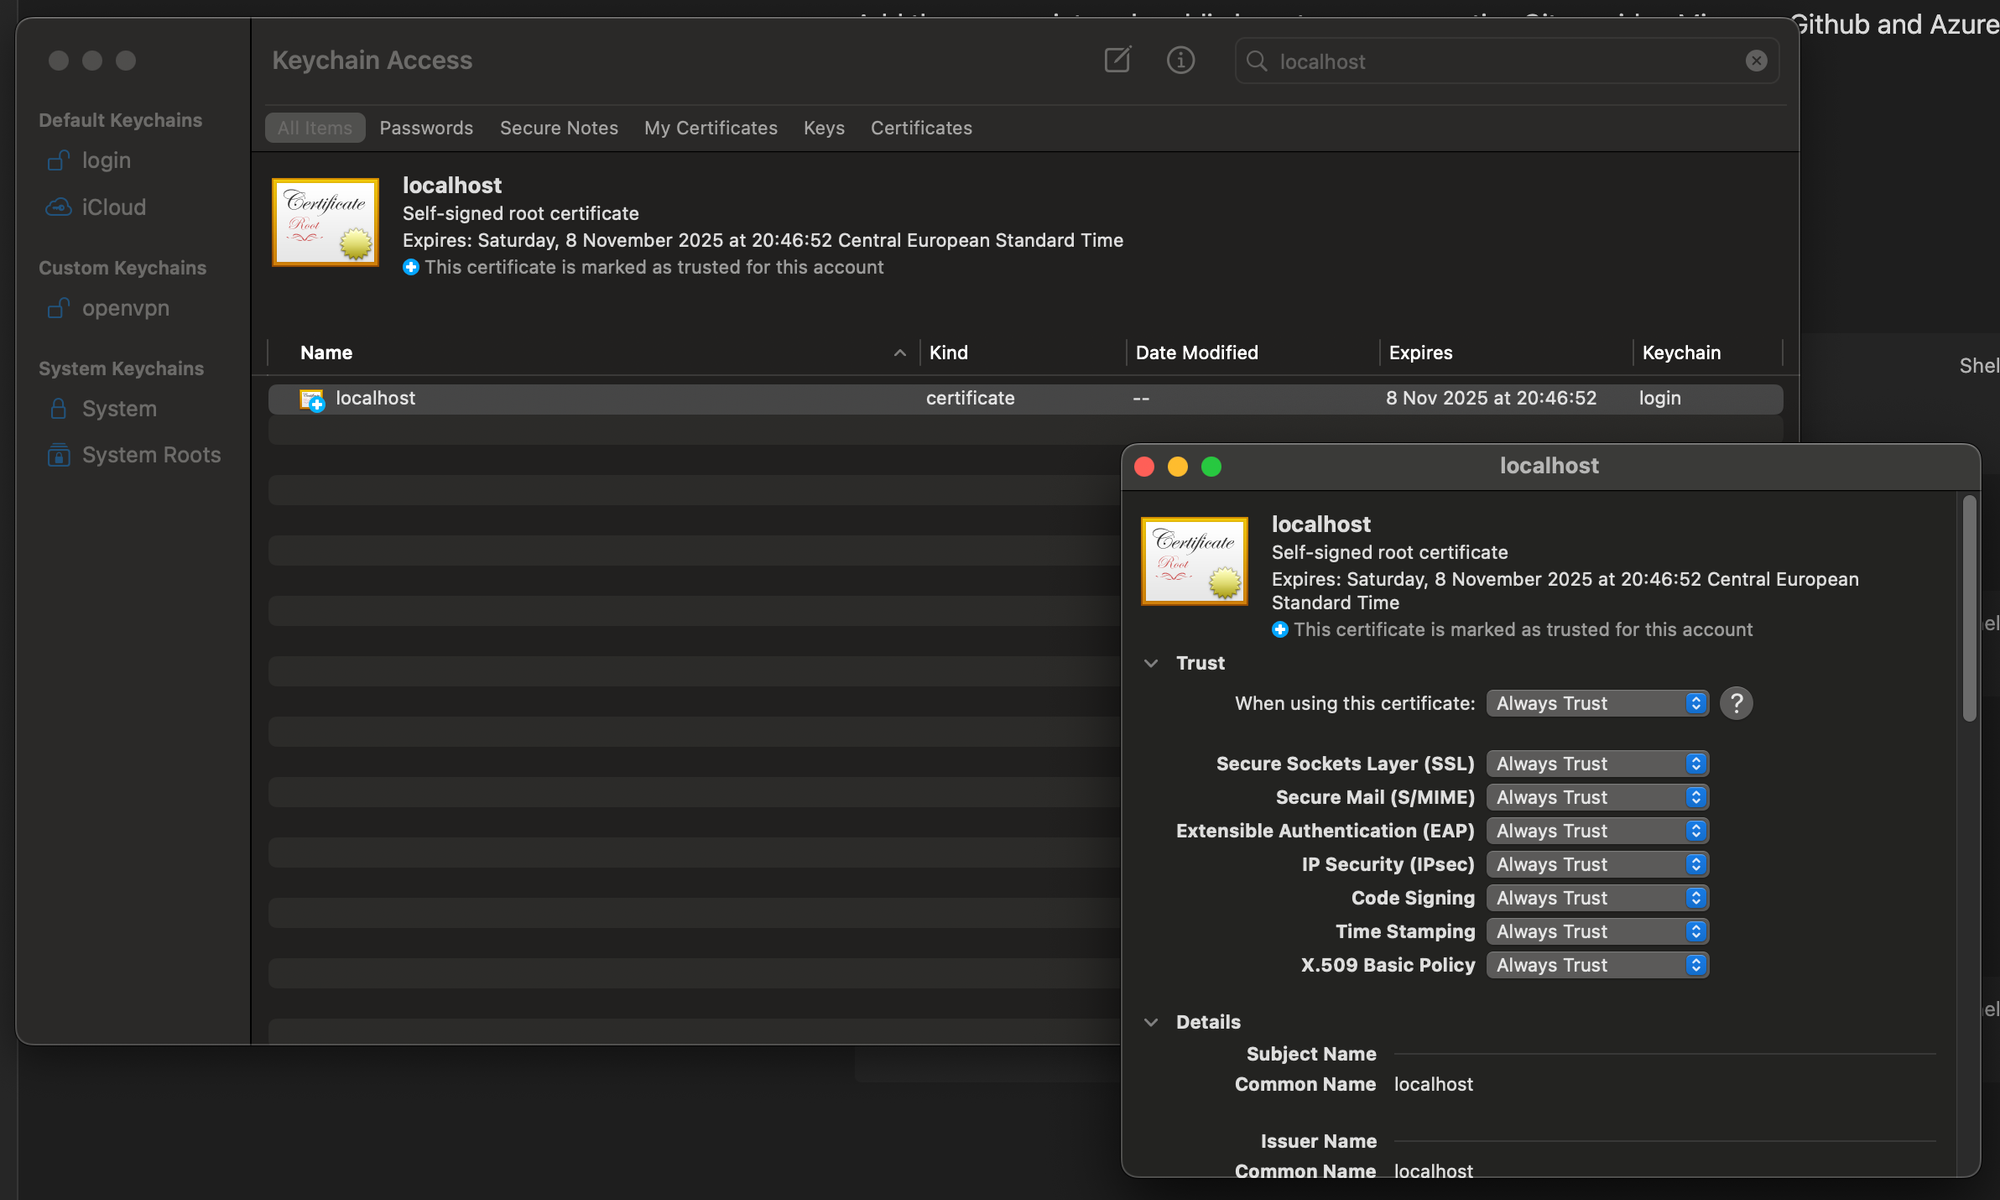
Enter the "Keychain Access" app and search for the certificate "localhost". Double-click and expand "Trust". Set "When using this certificate" to "Always trust".

Use Azure Artifacts Credential Provider for accessing private nuget feeds
Download and install.
sh -c "$(curl -fsSL https://aka.ms/install-artifacts-credprovider.sh)"
Login and restore using the dotnet restore --interactive command.
Add it to Rider configuration under "Build, Execution, Deployments > Nuget > Credential Providers".

Azure Functions local development
Sometimes we do development with serverless tech. I personally dislike Azure Functions due to the poor developer experience. However! Here's how to make that a bit easier on a Mac!
Install cli with brew
Install azure function cli with brew.
brew tap azure/functions
brew install azure-functions-core-tools@4
How to make dotnet-isolated run on Apple Silicon
I got this error when trying to run the Azure function locally.
A host error has occurred during startup operation 'xxx-xxxx-xxxx-xxxx'.
[2023-02-17T16:33:49.933Z] Grpc.Core: Error loading native library.
 Not found in any of the possible locations: [...]/bin/output/.azurefunctions/libgrpc_csharp_ext.arm64.dylib,[...]/bin/output/.azurefunctions/runtimes/osx-arm64/native/libgrpc_csharp_ext.arm64.dylib,[...]/bin/output/.azurefunctions/../../runtimes/osx-arm64/native/libgrpc_csharp_ext.arm64.dylib.
Value cannot be null. (Parameter 'provider')
Add the following to your .csproj.
<PackageReference Include="Contrib.Grpc.Core.M1" Version="2.46.7" />
<Target Name="CopyGrpcNativeAssetsToOutDir" AfterTargets="Build">
  <ItemGroup>
	  <NativeAssetToCopy Condition="$([MSBuild]::IsOSPlatform('OSX'))" Include="$(OutDir)runtimes/osx-arm64/native/*" />
  </ItemGroup>
  <Copy SourceFiles="@(NativeAssetToCopy)" DestinationFolder="$(OutDir).azurefunctions/runtimes/osx-arm64/native" />
</Target>
Source: https://github.com/microsoft/durabletask-dotnet/issues/148
Copy local config from an existing Azure Function
Copy the appsettings from a function app in the cloud with az cli! Simply run func azure functionapp fetch-app-settings <your-app> to get the config from the cloud.
Conclusion
I hope that all, or parts, of my tips work in your favor! Setting up a MacBook Pro for software development usually requires a bit more than flipping the lid; it also means creating an environment that caters to your setup. Besides the adjustments that are installed for convenience, some of them establish the true capabilities of a machine made to perform. For example, over the past month, I've learned that even just a little hard work up-front pays off massively on a long-term basis.
From .NET to Kubernetes, or whatever your interest is, get things set up so they save you time and hassles later. Remember, it's not only about working faster; it's about working better. Cheers to doing great stuff for a machine that just feels right.