I saw an ad for self-watering plant pots a while ago - and I thought it looked pretty neat. As I looked at the hefty price of 4.000 NOK for the system, I thought to myself that it would be cheaper and more fun to make my own with spare parts from around the house and components ordered from AliExpress.
Disclaimer! This build is in no way the same quality as one would get for 4.000 NOK. The price of this build is around 1.500 NOK and is in no way cheap compared to other alternatives. However, there's no price point on fun and the learning experience.
Here's a list of the components needed for this build:
- Raspberry Pi (3B) with power adapter
- DS18B20 temperature sensors x 2
- Capacitive soil moisture sensor x 2
- Phyto lamp for plants x 2
- Water pump x 2
- MCP3008 ADC
- Power Relay with 4 channels
- Breadboard
- Jumper wires
- 4.7 Ohm resistor
- Vinyl tube
- Plant pots
- Water tank
- Wood and plastic to build a frame
A simple workflow for this build. Every 30 minutes the sensors check two things, soil moisture, and soil temperature. Once soil moisture is too low, we trigger the water pump for a few seconds. Once the soil temperature is too low, we trigger the lamp until we reach the ideal temperature.
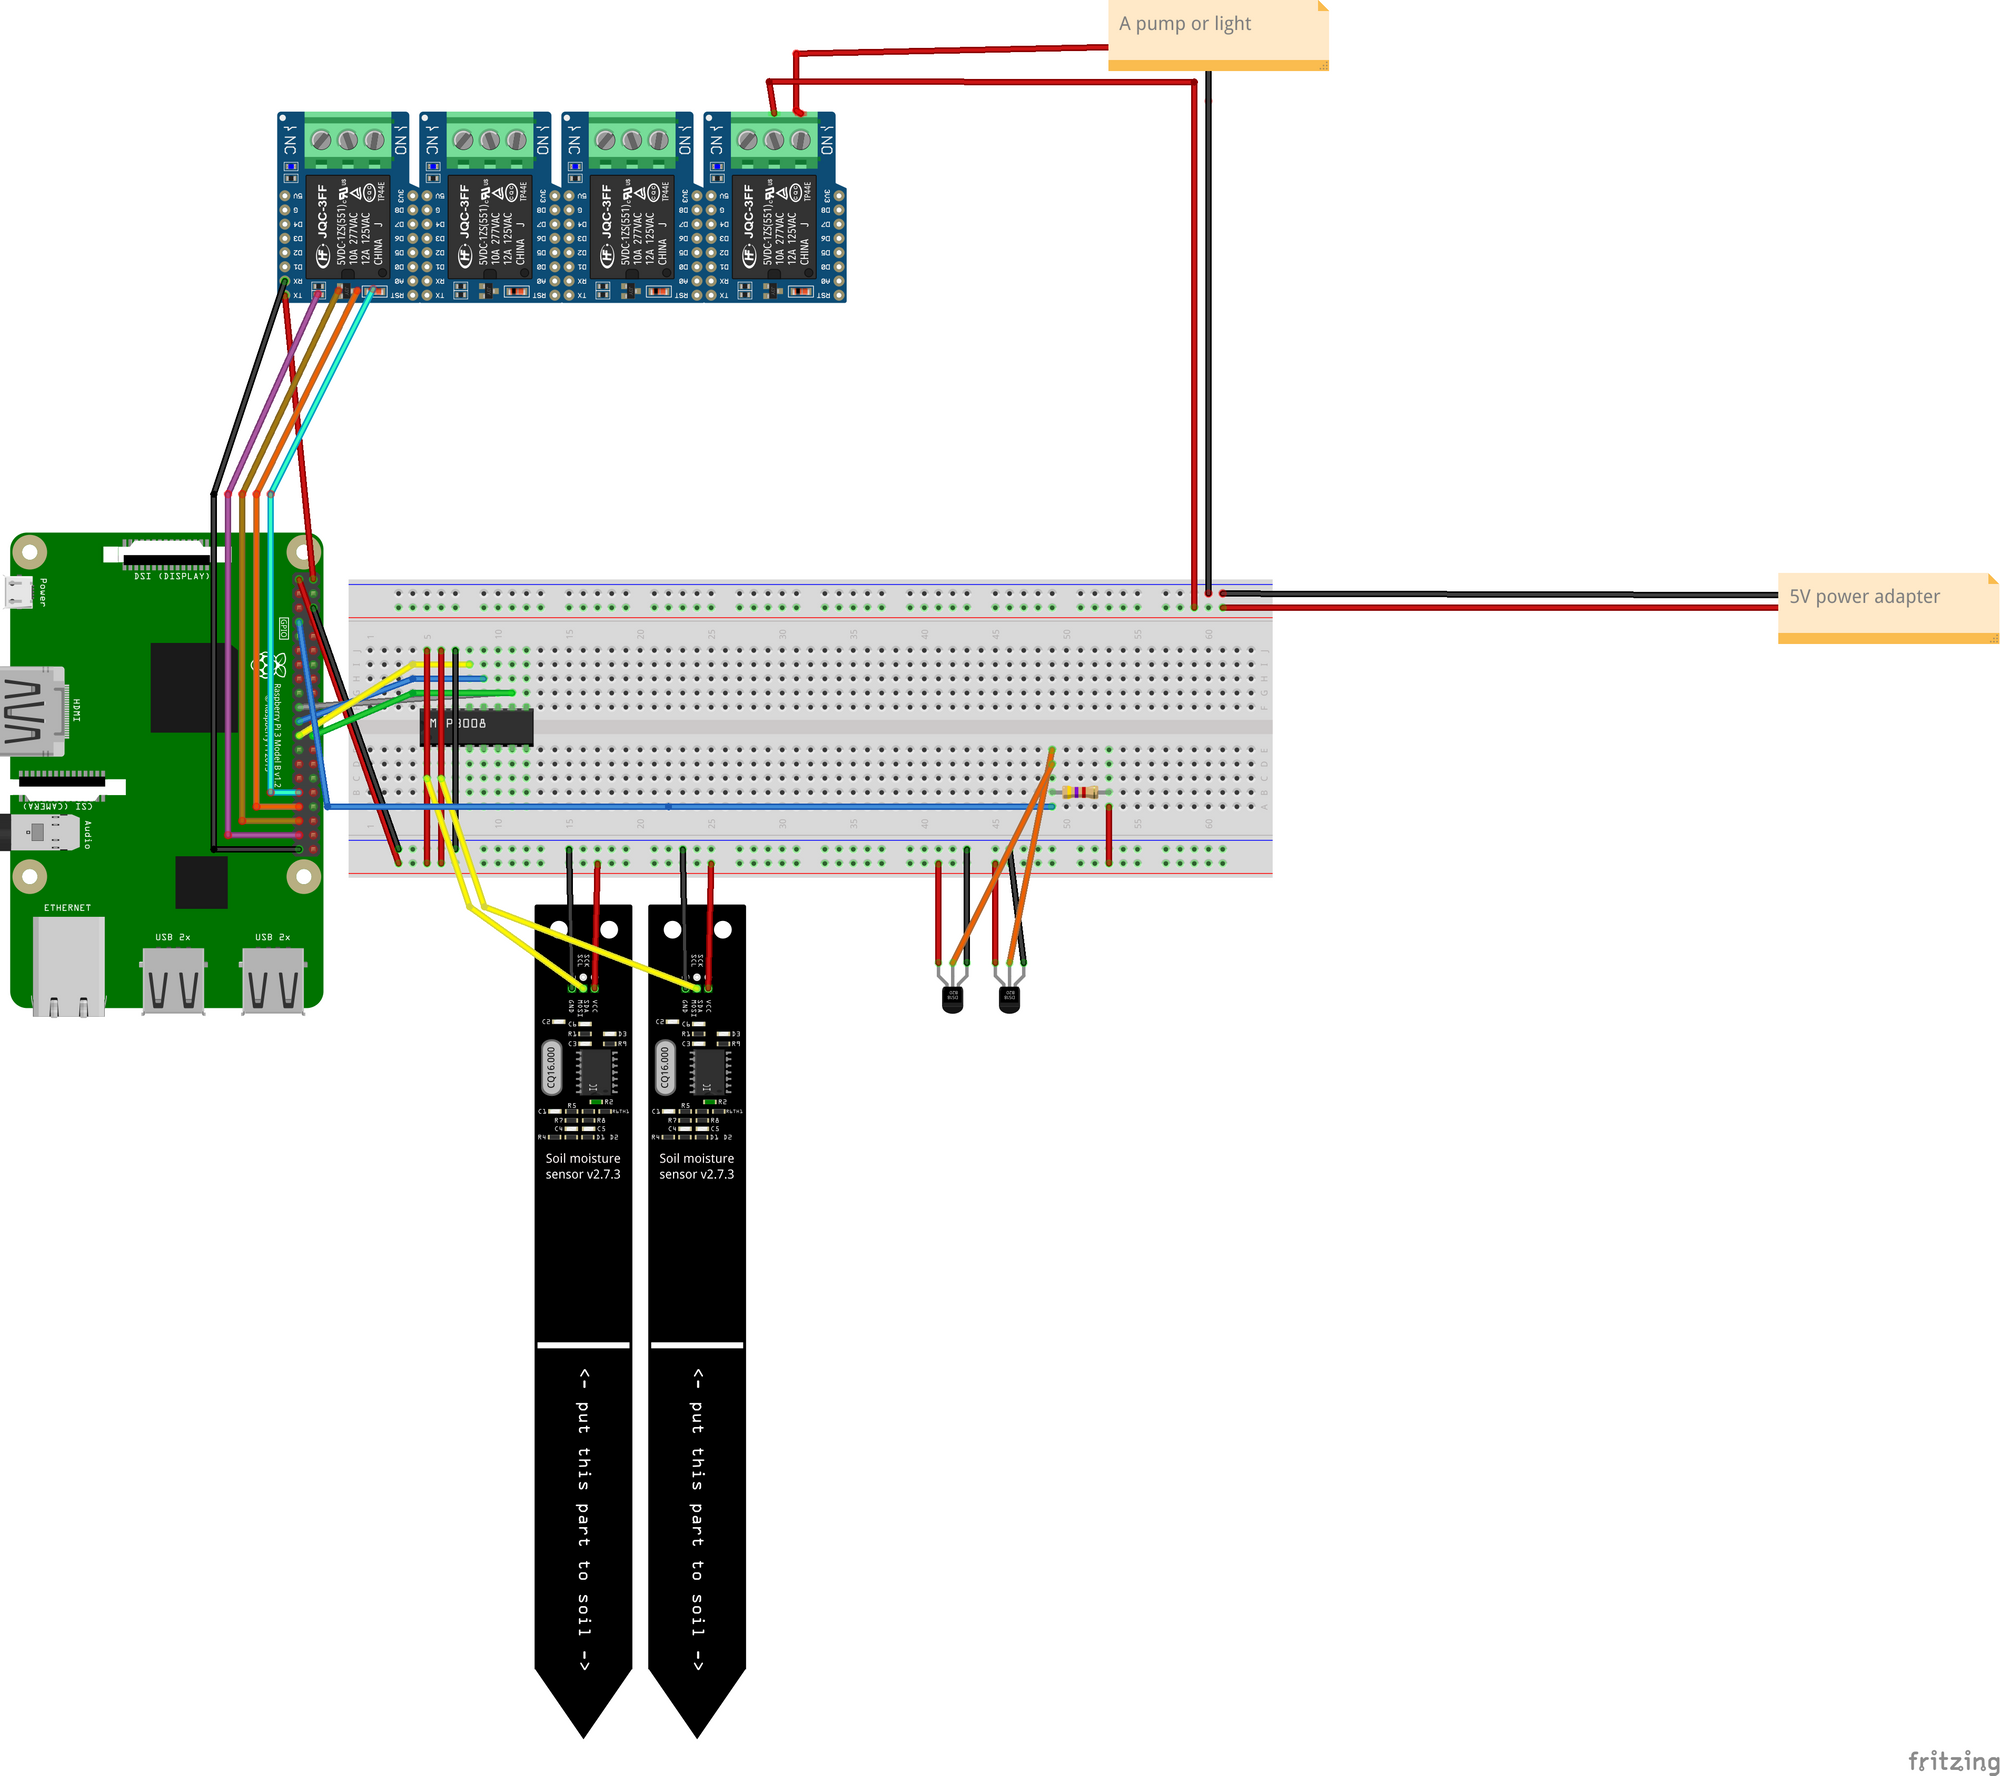
The hardware and the wiring
I'm a beginner at circuits and I've learned a lot about breadboards and GPIO connections from this build. By making two plant pots we have to work with multiple sensors. Which was a challenge for me, but I managed to set up a nice schema for the circuits.
I got both the water pumps and the phyto lamps with USB connections. To power them on or off we need to connect them to a power relay component. I cut off the USB connection of the water pumps and the lamps. I have a power adapter that is 5V. That is perfect for my components that take either 3.3V or 5V. The power relay connects to the 5V and the ground on the Raspberry Pi. We also select some generic GPIO pins to each relay to control them.
- Connect the power adapter ground to the breadboard power strip for ground.
- Connect lamps and pumps ground to the power adapter ground on the breadboard.
- Connect VCC of the power adapter to the breadboard power strip for VCC.
- Connect VCC of the power adapter from the breadboard to relay module
I was originally going to use a utility for switching USB ports on or off: uhubctl. Unfortunately, Raspberry Pi turns the power off on all ports, not just the one I specified. This is the limitation of Raspberry Pi hardware design. I also bought an additional USB hub (D-Link DUB-H7), however, it wasn't supported 😔.
All of the sensors require a 3.3V - 5V power supply to work. We'll be powering the sensors with the 3.3V outlet on the Raspberry Pi through the breadboard.
The soil moisture sensor is analog. That means we need to convert that to a digital signal which the Raspberry Pi supports. This is achieved by using an analog-to-digital converter (ADC). The MCP3008 supports up to eight channels. We're going to use two channels.
The DS18B20 temperature sensors are digital and require no additional converters. To operate as a 'pull-up' resistor, connect a resistor between the 3.3V and GPIO pin with a value of 4.7k Ohms to 10k Ohms.
All of the above put together will look something like this:
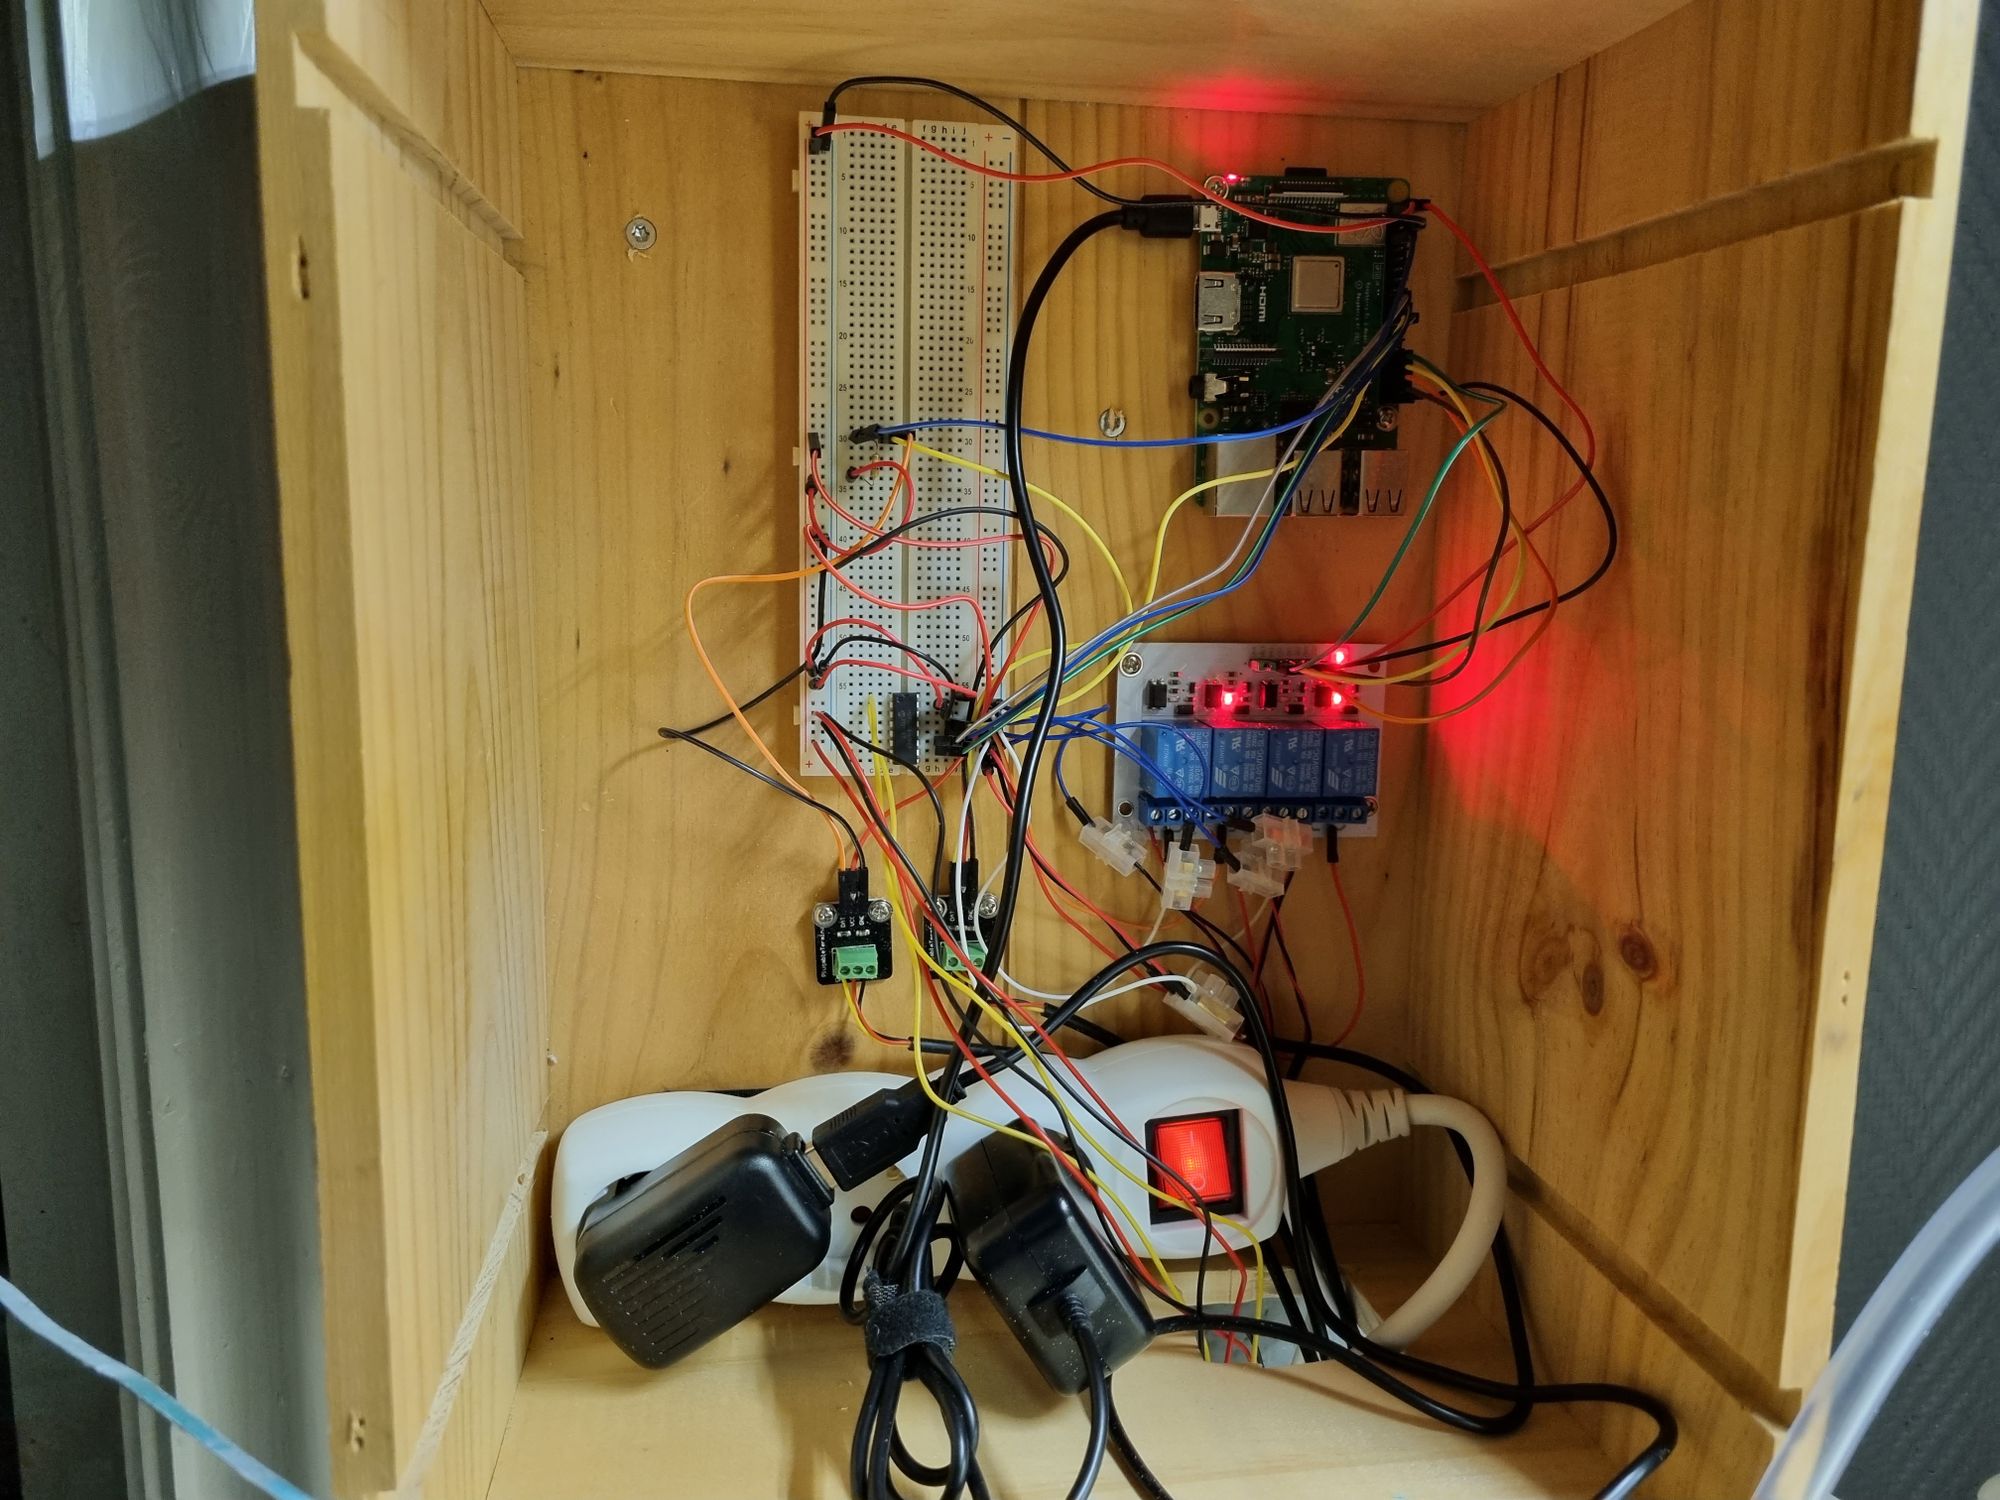
Here's the wiring IRL in all its messy glory.
The software
A cron job will run the dotnet scripts that will water the plants and turn the lights on or off. Sensor values will be sent to Azure IoT Central for every job triggered.
The microSD card has been flashed with the Raspberry Pi OS. One can easily do that with the Raspberry Pi imager tool. We now need to set up our environment for remote and dotnet development. I followed Microsoft's official guide for that. The VSCode plugin Remote SSH shows a way to remotely develop against a Raspberry Pi.
We need to enable some settings to make the sensors work. On the Raspberry Pi enter the config by sudo raspi-config and then Interface Options > SPI to enable SPI and Interface Options > 1-Wire to enable 1-wire. SPI will allow us to read from the ADC module and soil moisture sensors. 1-Wire will allow us to read from the temperature sensors.
Now we're ready to write some code. Microsoft (and others) offers some great guides to read data from the different modules. These are the guides that I followed to read from the sensors.
- Read values from an analog-to-digital converter
- 1-Wire README
- Create your first Raspberry Pi .NET Core C# IoT Application
To trigger the application every 30 minutes we need to register a cronjob. A cronjob is meant to execute repetitive tasks on the Raspberry Pi (and other unix based systems). It's written in the * * * * * <command to be executed> format.
# ┌───────────── minute (0 - 59)
# │ ┌───────────── hour (0 - 23)
# │ │ ┌───────────── day of the month (1 - 31)
# │ │ │ ┌───────────── month (1 - 12)
# │ │ │ │ ┌───────────── day of the week (0 - 6) (Sunday to Saturday;
# │ │ │ │ │              7 is also Sunday on some systems)
# │ │ │ │ │
# │ │ │ │ │
# * * * * * <command to execute>
I chose to run the application as a worker application based on the dotnet-labs sample for cron jobs. Our cronjob will look like this: */30 * * * *. We could trigger these jobs from the Azure IoT Central, but there are limitations on the frequency that these jobs can run (once per day). Registering the cron job is easy.
using System.Reflection;
using herbinator;

using var host = Host.CreateDefaultBuilder(args)
    .UseContentRoot(Path.GetDirectoryName(Assembly.GetEntryAssembly()?.Location))
    .ConfigureServices((hostContext, services) =>
    {
        services.AddCronJob<PlantJob>(c =>
        {
            c.TimeZoneInfo = TimeZoneInfo.Local;
            c.CronExpression = @"*/30 * * * *";
        });
    })
    .Build();

await host.RunAsync();
I chose to store the plant pot settings in a JSON file. Each plant pot has a thermometer and a soil moisture sensor that has some corresponding settings. To read the thermometer needs to know busId and deviceId. This is easy to obtain by running the samples for 1-Wire above. We also set a threshold for temperature in Celsius by a minimal and a maximum value. The soil moisture sensor is read by channel from the MCP3008 ADC. MCP3008 ADC uses the SPI interface to communicate with the Raspberry Pi. We use channels 0 and 1. One for each plant. MCP3008 ADC supports up to eight channels. The readings from the soil moisture sensors are defined by the given intervals as defined by this guide:
- Dry: 430-520
- Wet: 350-430
- Water: 260-350
We set the threshold by how wet we want our soil. The depth of the probe insertion and how tightly the soil is packed around it influence the ultimate output value.
To control the pump and the lights from the relay, we need to know what GPIO pin those are connected to. We need to write pin values to turn the relay on or off.
For my basil plant pot, I want the temperature to range from 20 to 25 degrees celsius. I set the wetness of the soil to about 400. I also set the same settings on my cilantro.
{
  "plants":[
    {
      "id": 0,
      "name": "Basil",
      "connectionString": "<connectionstring>",
      "soilMoisture": {
        "channel": 0,
        "moistureThreshold": 400
      },
      "thermometer": {
        "deviceId": "28-86010c1e64ff",
        "busId": "w1_bus_master1",
        "max": 25
      },
      "pumpGpio": 19,
      "lightGpio": 26
    },
    {
      "id": 1,
      "name": "Cilantro",
      "connectionString": "<connectionstring>",
      "soilMoisture": {
        "channel": 1,
        "moistureThreshold": 400
      },
      "thermometer": {
        "deviceId": "28-86010c1e64ff",
        "busId": "w1_bus_master1",
        "max": 25
      },
      "pumpGpio": 6,
      "lightGpio": 13
    }
  ]
}
Here's the same model in C#.
using Iot.Device.OneWire;

public record PlantConfiguration(IEnumerable<Plant> Plants);
public record Plant(int Id, string ConnectionString, string Name, SoilMoisture SoilMoisture, Thermometer Thermometer, int PumpGpio, int LightGpio);
public record Thermometer(string DeviceId, string BusId, double Max)
{
    public OneWireThermometerDevice Device => new(BusId, DeviceId);
}
public record SoilMoisture(int Channel, double MoistureThreshold);
Our main method ties everything together and quite simply loop through the plants, checks sensor readings, and triggers relay.
foreach (var plant in plantConfiguration!.Plants)
{
    var degrees = await HandleThermometer(plant);
    var soilMoisture = await HandleSoilMoisture(plant);
    await SendMsgIotHub(plant, degrees, soilMoisture);
}
When watering plants we need to read values from our ADC on given channels. .NET makes this easy with the SpiDevice class. If the readings are below the threshold we activate the pump for 2 seconds by sending a high pin value and a low pin value 2 seconds later.
private Task<double> HandleSoilMoisture(Plant plant)
{
    var hardwareSpiSettings = new SpiConnectionSettings(0, 0);
    using var spi = SpiDevice.Create(hardwareSpiSettings);
    using var mcp = new Mcp3008(spi);
    double soilMoisture = mcp.Read(plant.SoilMoisture.Channel);
    if (soilMoisture > plant.SoilMoisture.MoistureThreshold)
    {
        using GpioController controller = new();
        controller.OpenPin(plant.PumpGpio, PinMode.Output);
        controller.Write(plant.PumpGpio, PinValue.High);

        Thread.Sleep(2000);

        controller.Write(plant.PumpGpio, PinValue.Low);
    }

    Console.WriteLine($"Soil moisture for {plant.Name}: {soilMoisture}");
    return Task.FromResult(soilMoisture);
}
Lights are controlled by the temperature device readings. OneWireThermometerDevice makes reading from a thermometer a dream.
private async Task<double> HandleThermometer(Plant plant)
{
    var thermometerDevice = plant.Thermometer.Device;
    var temperature = await thermometerDevice.ReadTemperatureAsync();
    if (temperature.DegreesCelsius > plant.Thermometer.Max)
    {
        using GpioController controller = new();
        controller.OpenPin(plant.LightGpio, PinMode.Output);
        controller.Write(plant.LightGpio, PinValue.Low);
    }
    else
    {
        using GpioController controller = new();
        controller.OpenPin(plant.LightGpio, PinMode.Output);
        controller.Write(plant.LightGpio, PinValue.High);
    }

    Console.WriteLine($"Temperature for {plant.Name}: {temperature.DegreesCelsius:F2}°C");
    return temperature.DegreesCelsius;
}
Sending data to Azure IoT Central
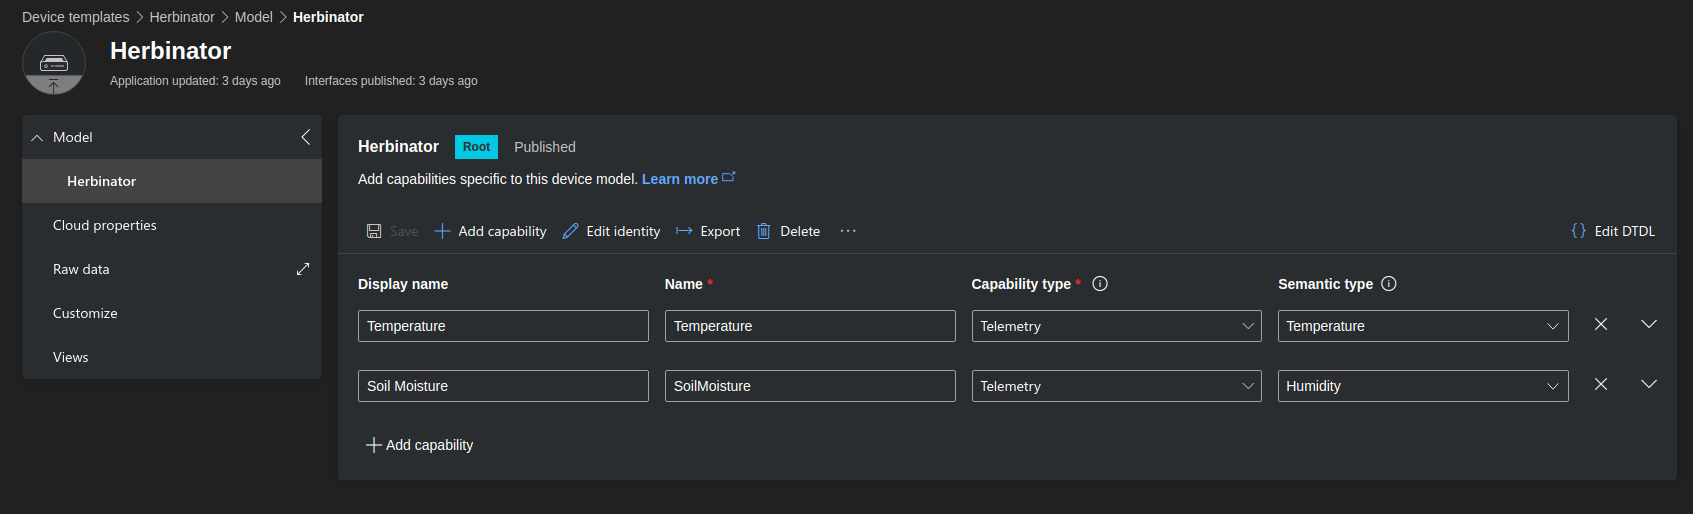
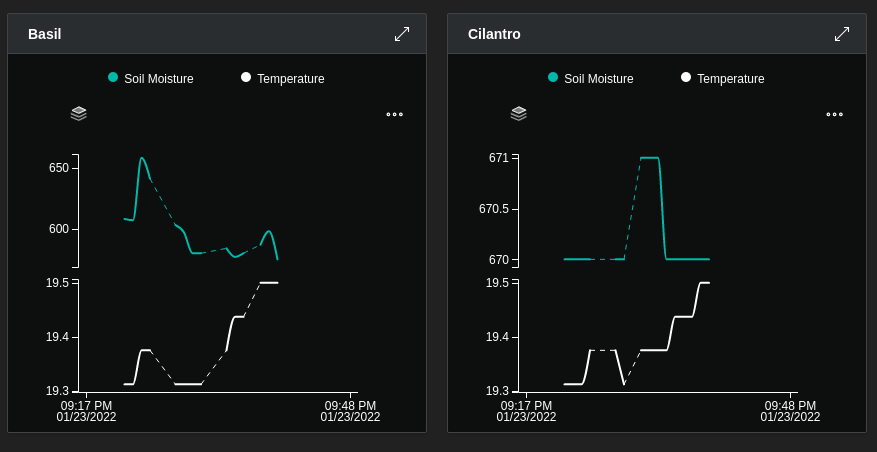
To more easily understand what's going on in the system, we wish to send sensor data to the Azure IoT Central. That way we can create graphs on how our herbs are thriving. One can easily create an IoT Central here. We want to send the values for soil moisture and temperature to Azure IoT Central. Let's create a device. First, we need a device template.
We've got two devices, one for each plant. This will result in two separate connection strings for connecting with the Azure IoT Central. Create device with Devices > New. After that, we can connect to the device and send telemetry. Click the Connect button and use Azure IoT Central Connection String Generator to generate a connection string. We're now ready to send telemetry to Azure IoT Central. There's also possible to manage the device from the IoT Central, but for now, we will just stick with sending telemetry. This is how we send telemetry from our code.
private async Task SendMsgIotHub(Plant plant, double degreesCelsius, double soilMoisture)
{
    var deviceClient = DeviceClient.CreateFromConnectionString(plant.ConnectionString, TransportType.Mqtt);
    var telemetry = new Telemetry(degreesCelsius, soilMoisture);
    var eventMessage = new Message(Encoding.UTF8.GetBytes(JsonSerializer.Serialize(telemetry)));
    await deviceClient.SendEventAsync(eventMessage);
}
After that, we can create visualizations for each of our plants.
Running the worker application on boot with systemd
Once the application is ready to run, we publish it with a linux-arm runtime like this: dotnet publish -r linux-arm. I hereby dub thee Herbinator 🌱 After that we give the program the right permissions with chmod +x herbinator. To make the application run on boot, we must create and register a systemd service. Run sudo vim /lib/systemd/system/herbinator.service and create a file that looks like this.
[Unit]
Description=Herbinator Water Monitoring
After=network.target

[Service]
ExecStart=/home/pi/path/to/project/herbinator

[Install]
WantedBy=network.target
Now we just need to register the service with sudo systemctl daemon-reload and sudo systemctl enable herbinator.service.
Putting everything together
I got myself some small boards of wood that I made some plant boxes from. I made two separate boxes for the plants. The measurements depend on the size of the plant pot. Here's what I used:
- Width x 2: 10cm x 20cm
- Bottom, middle, top: 15cm x 30cm
- Sides x 2: 7cm x 35cm
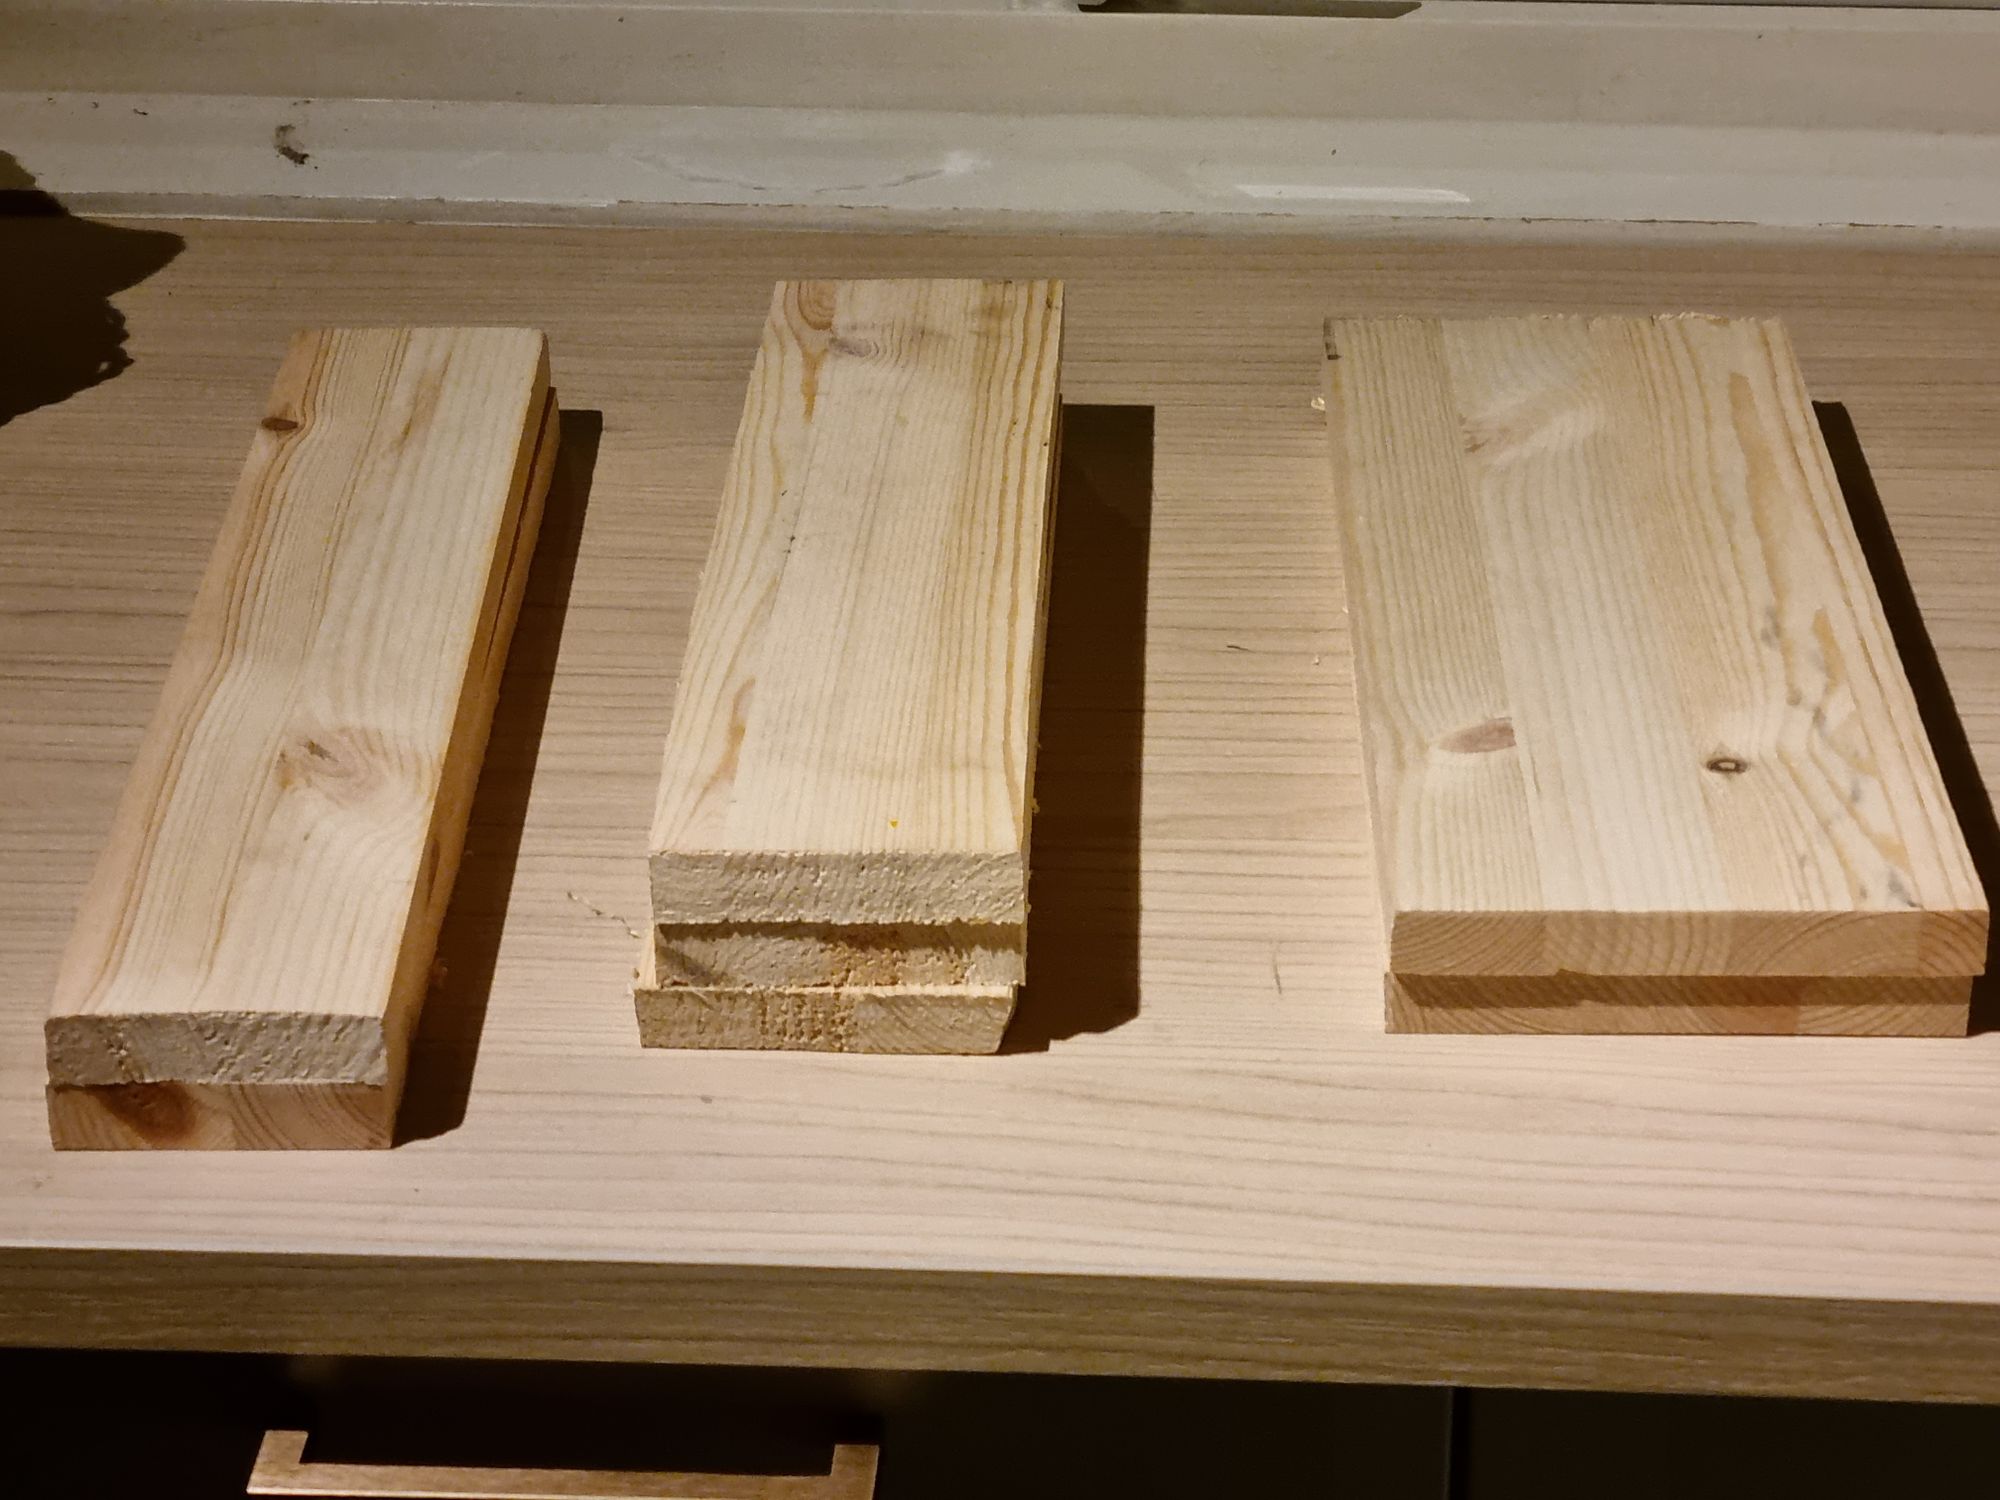
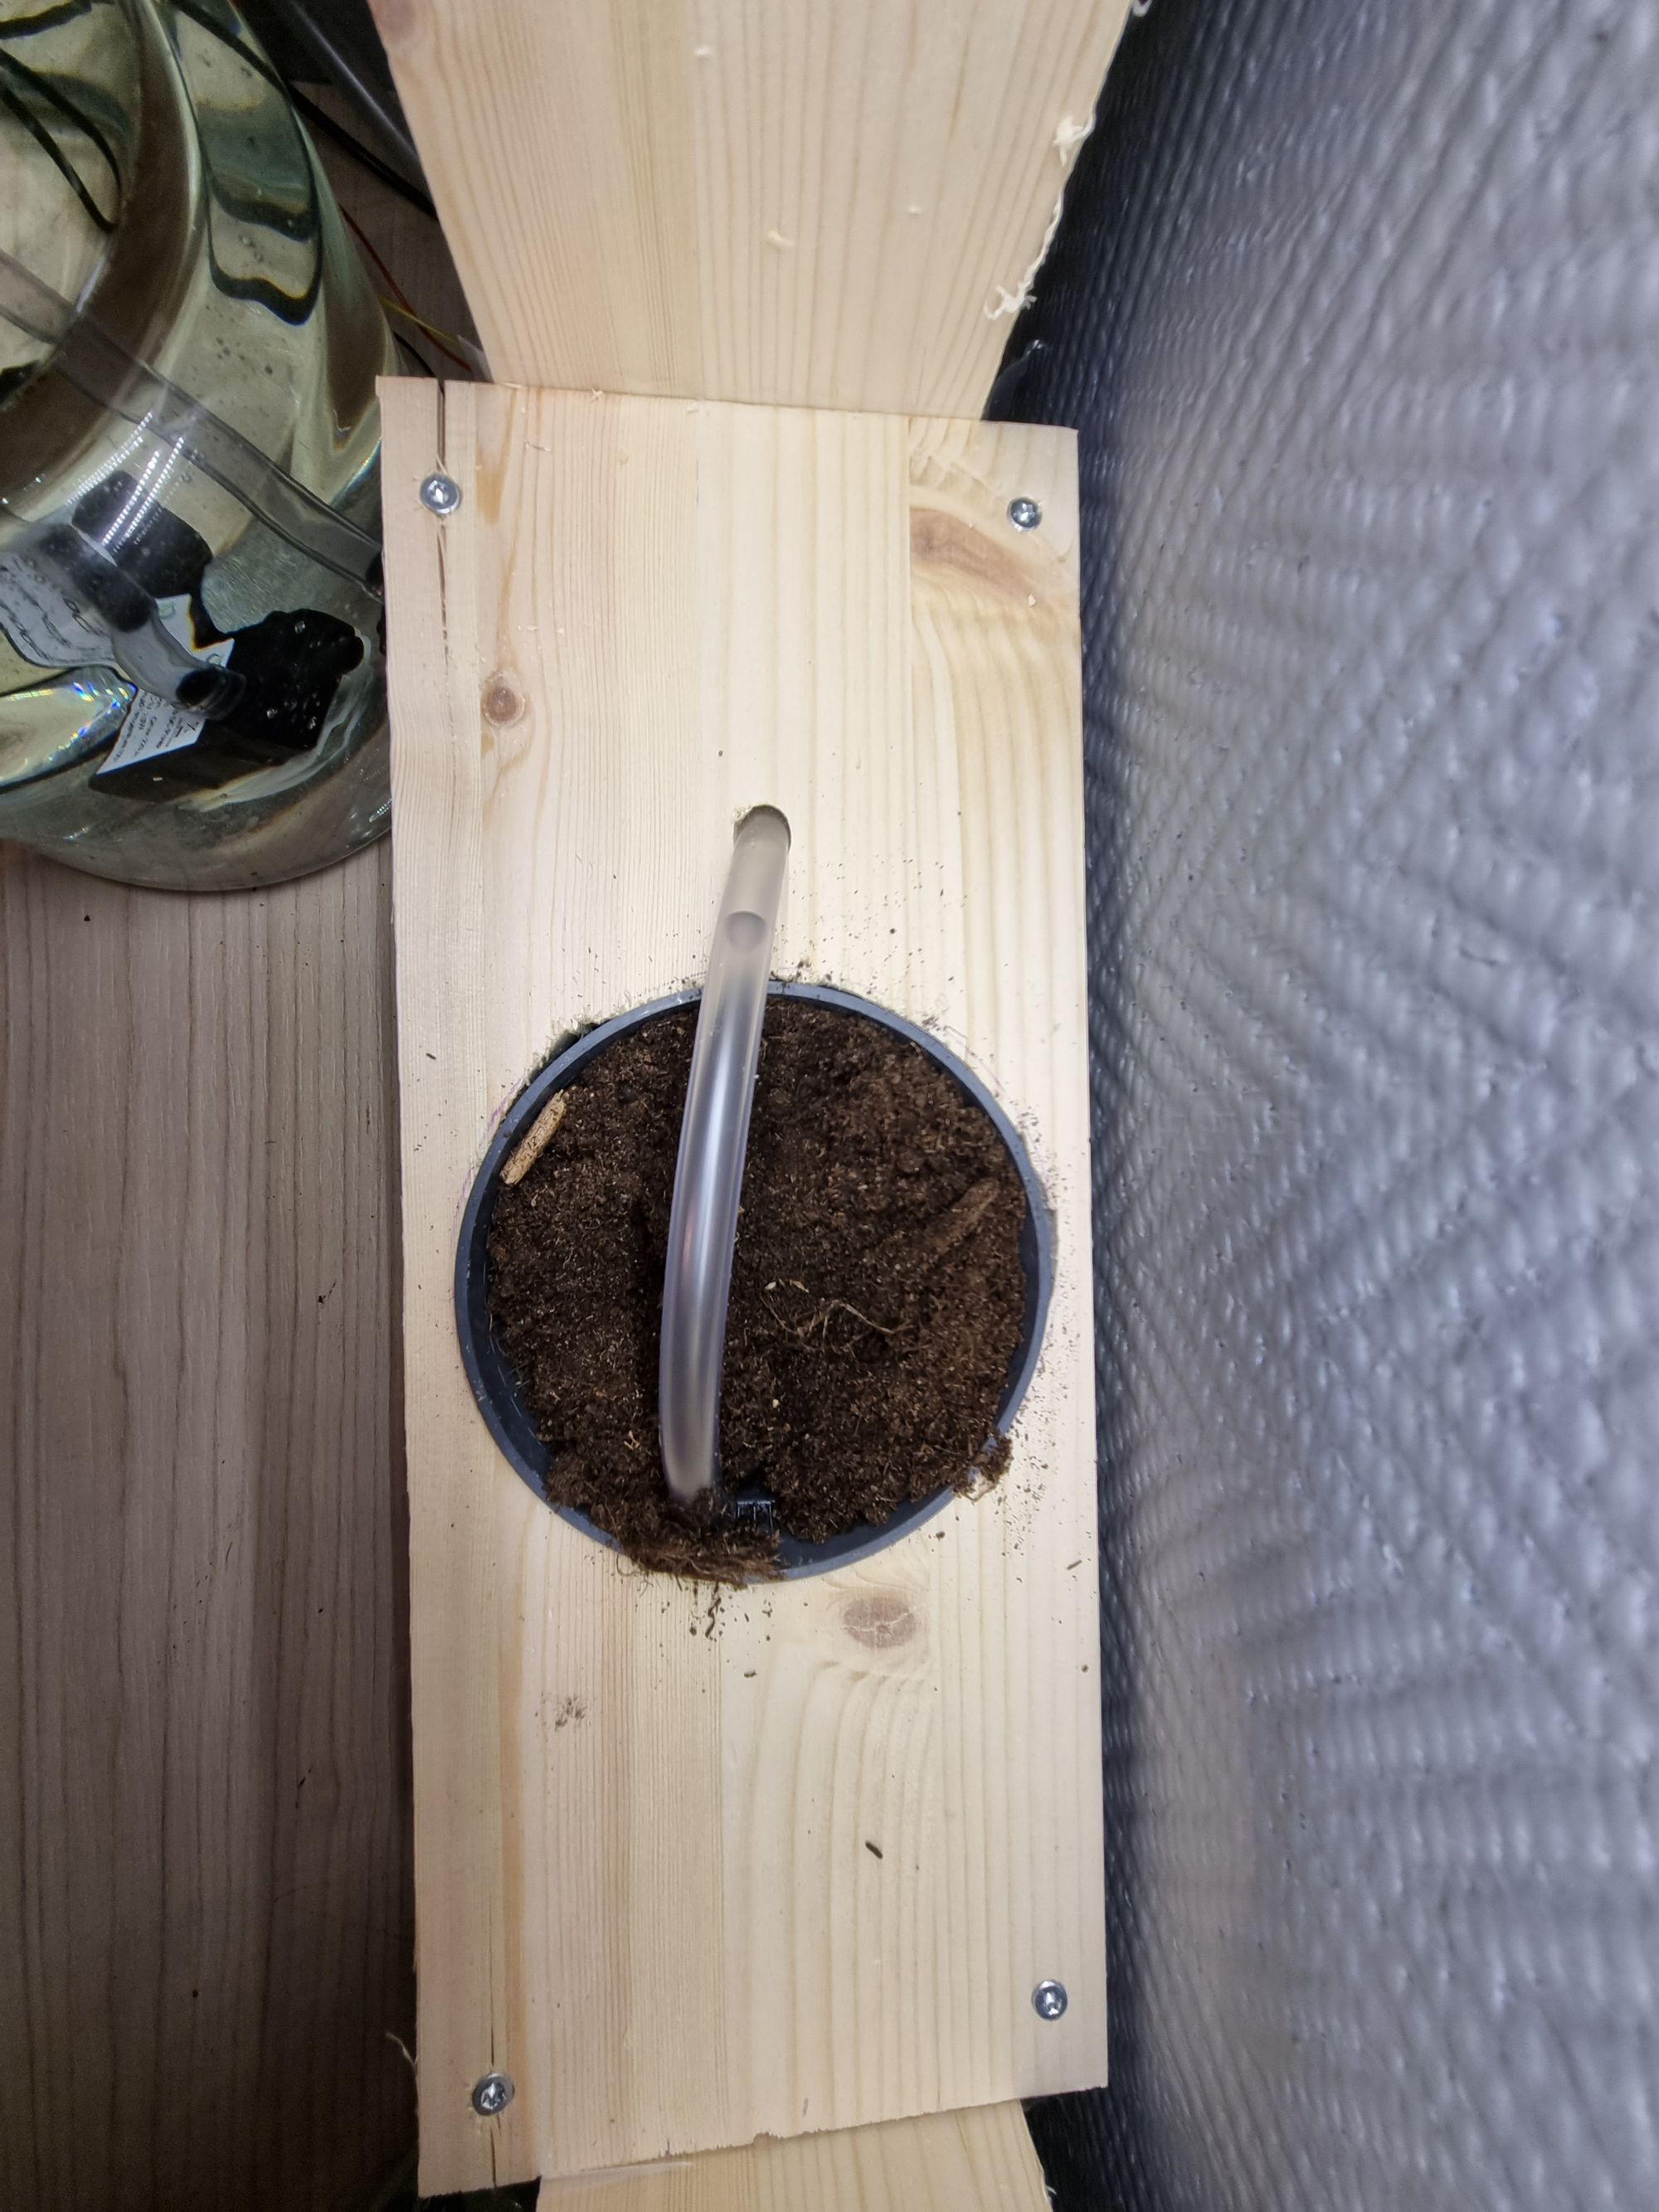
Assemble everything and fit with plastic inside the boxes to prevent leaking. Drill holes in boxes for the sensor wires, vinyl tube, and lamp. Also, drill holes for sensors in the plant pot.
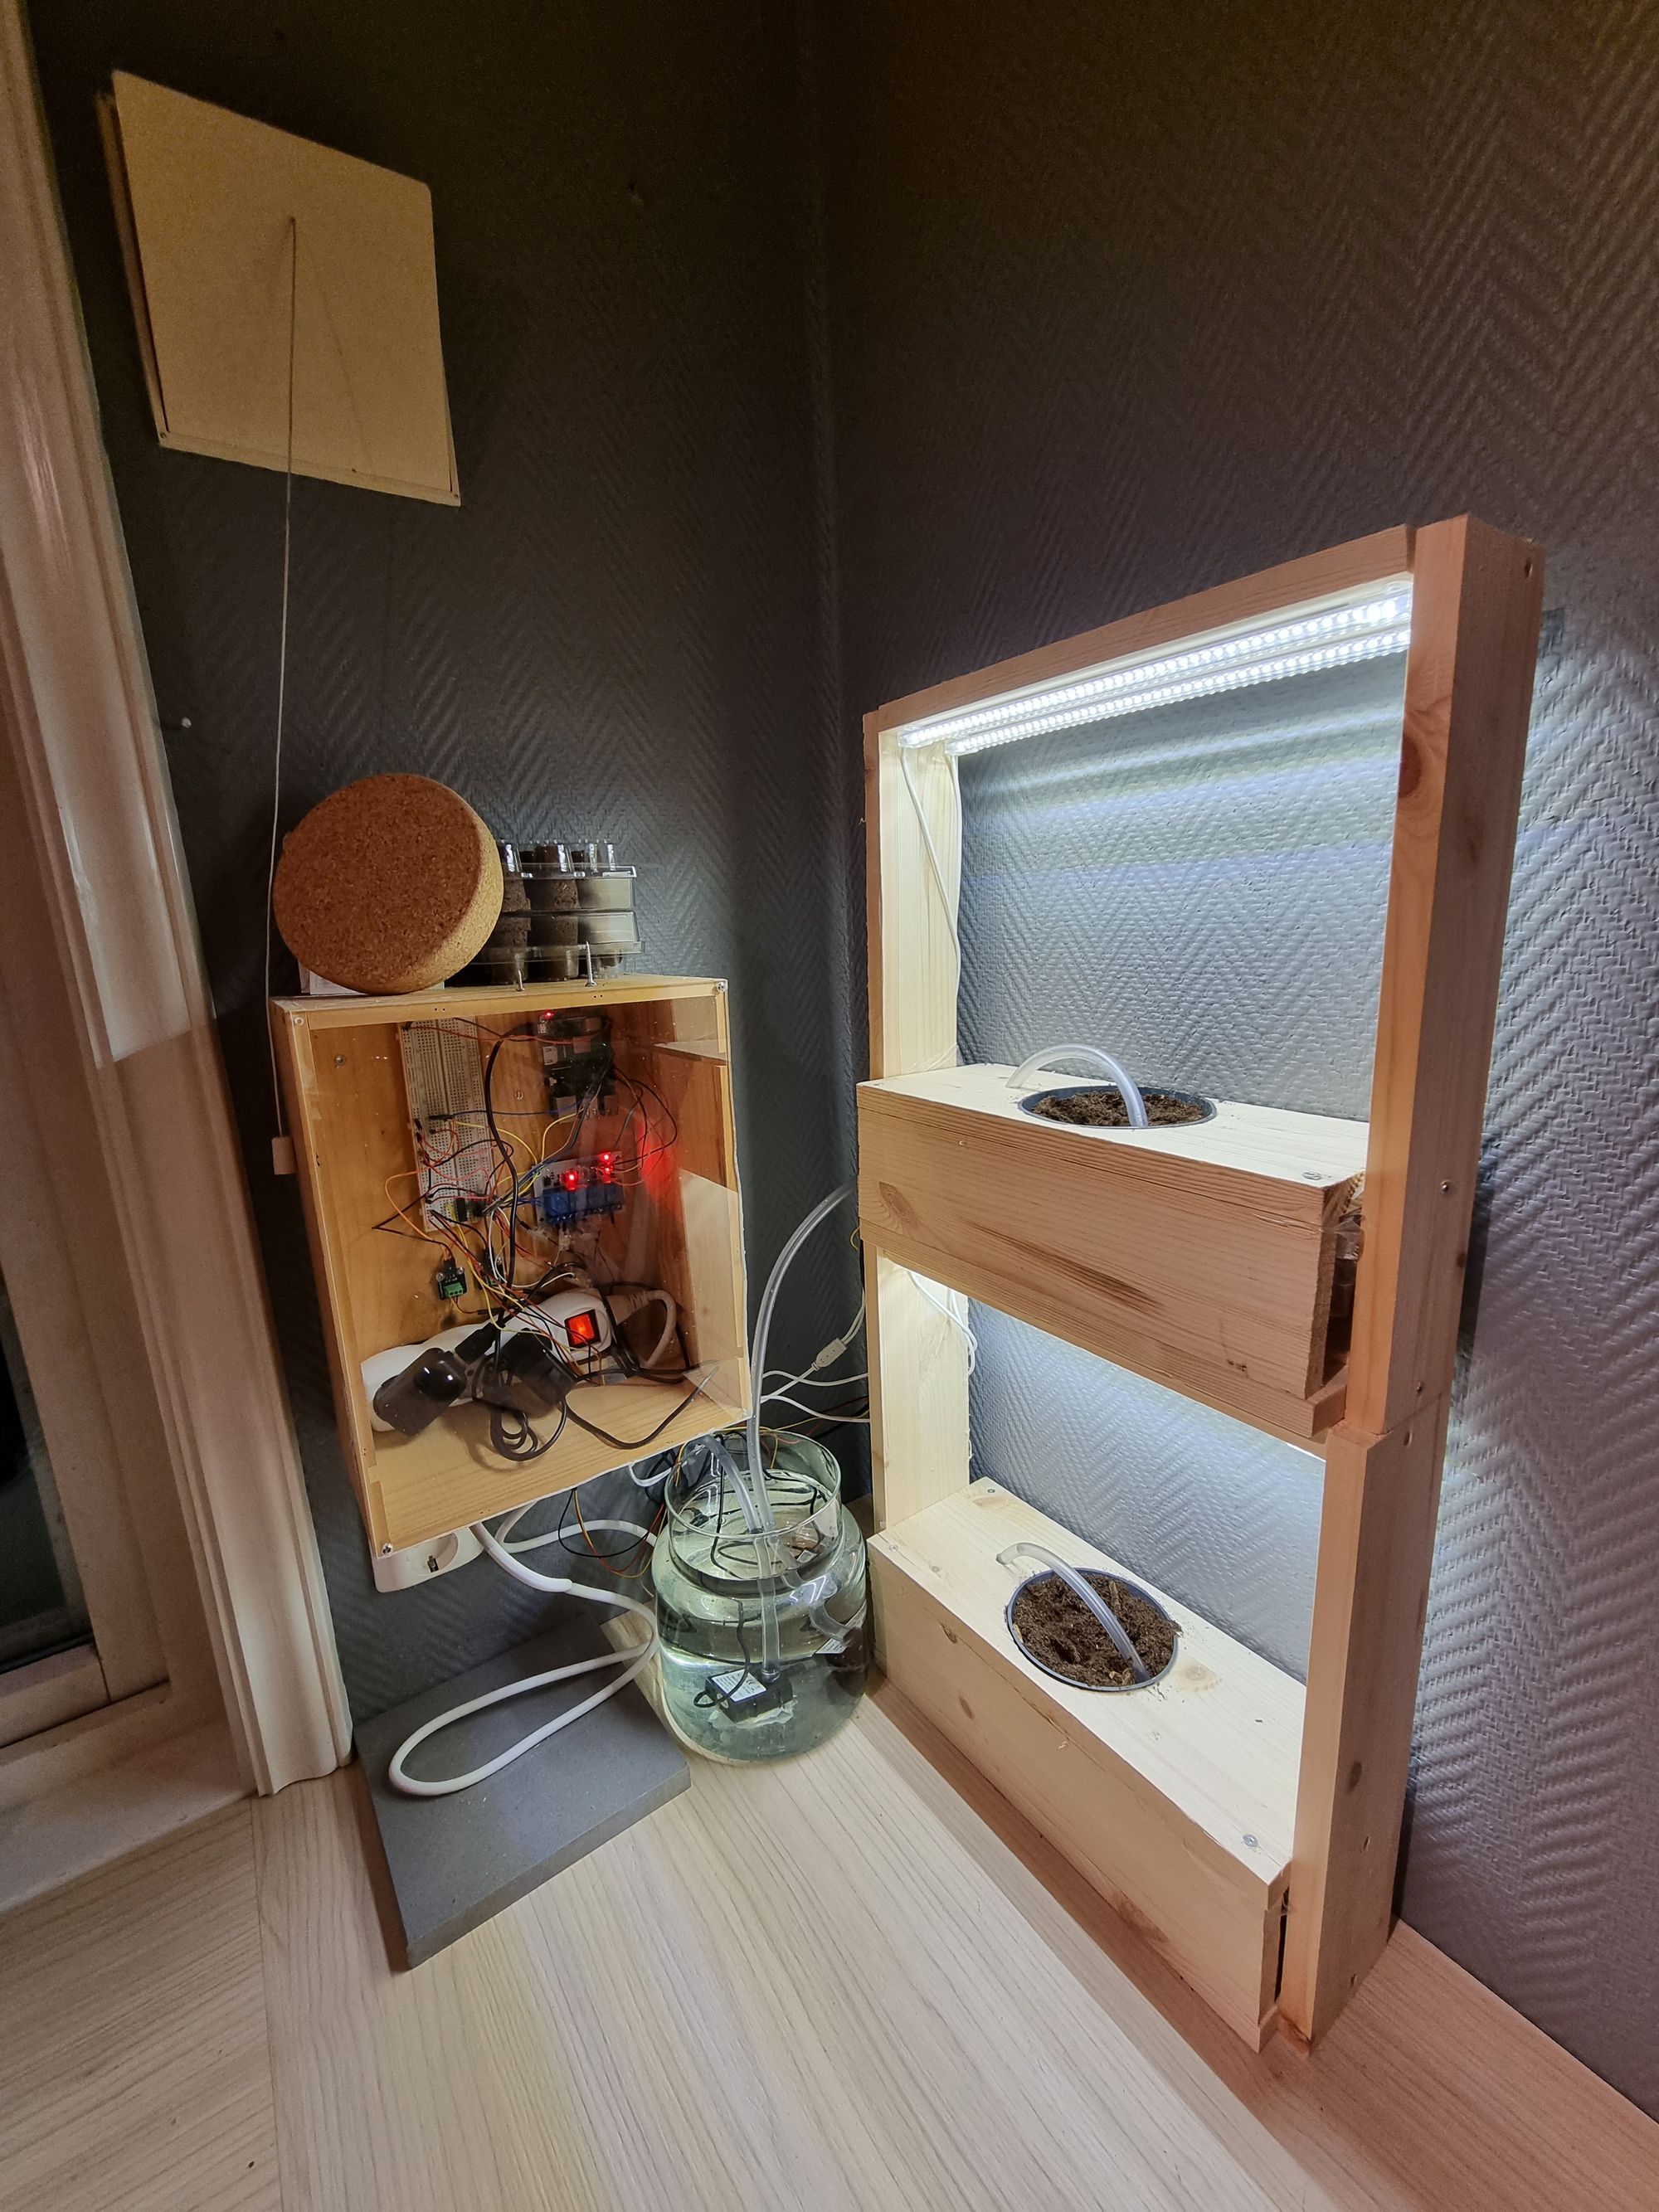
I found a wine case to house our hardware. That way we keep our electronics dry. It even has a plexiglass window to see through and to open for maintenance. I also found a small glass water container. Submerge the two pumps into the water and super glue them in place to the bottom of the container. Lead vinyl tubes and pump power wires from the top of the container and into the plant boxes and the Raspberry Pi case.
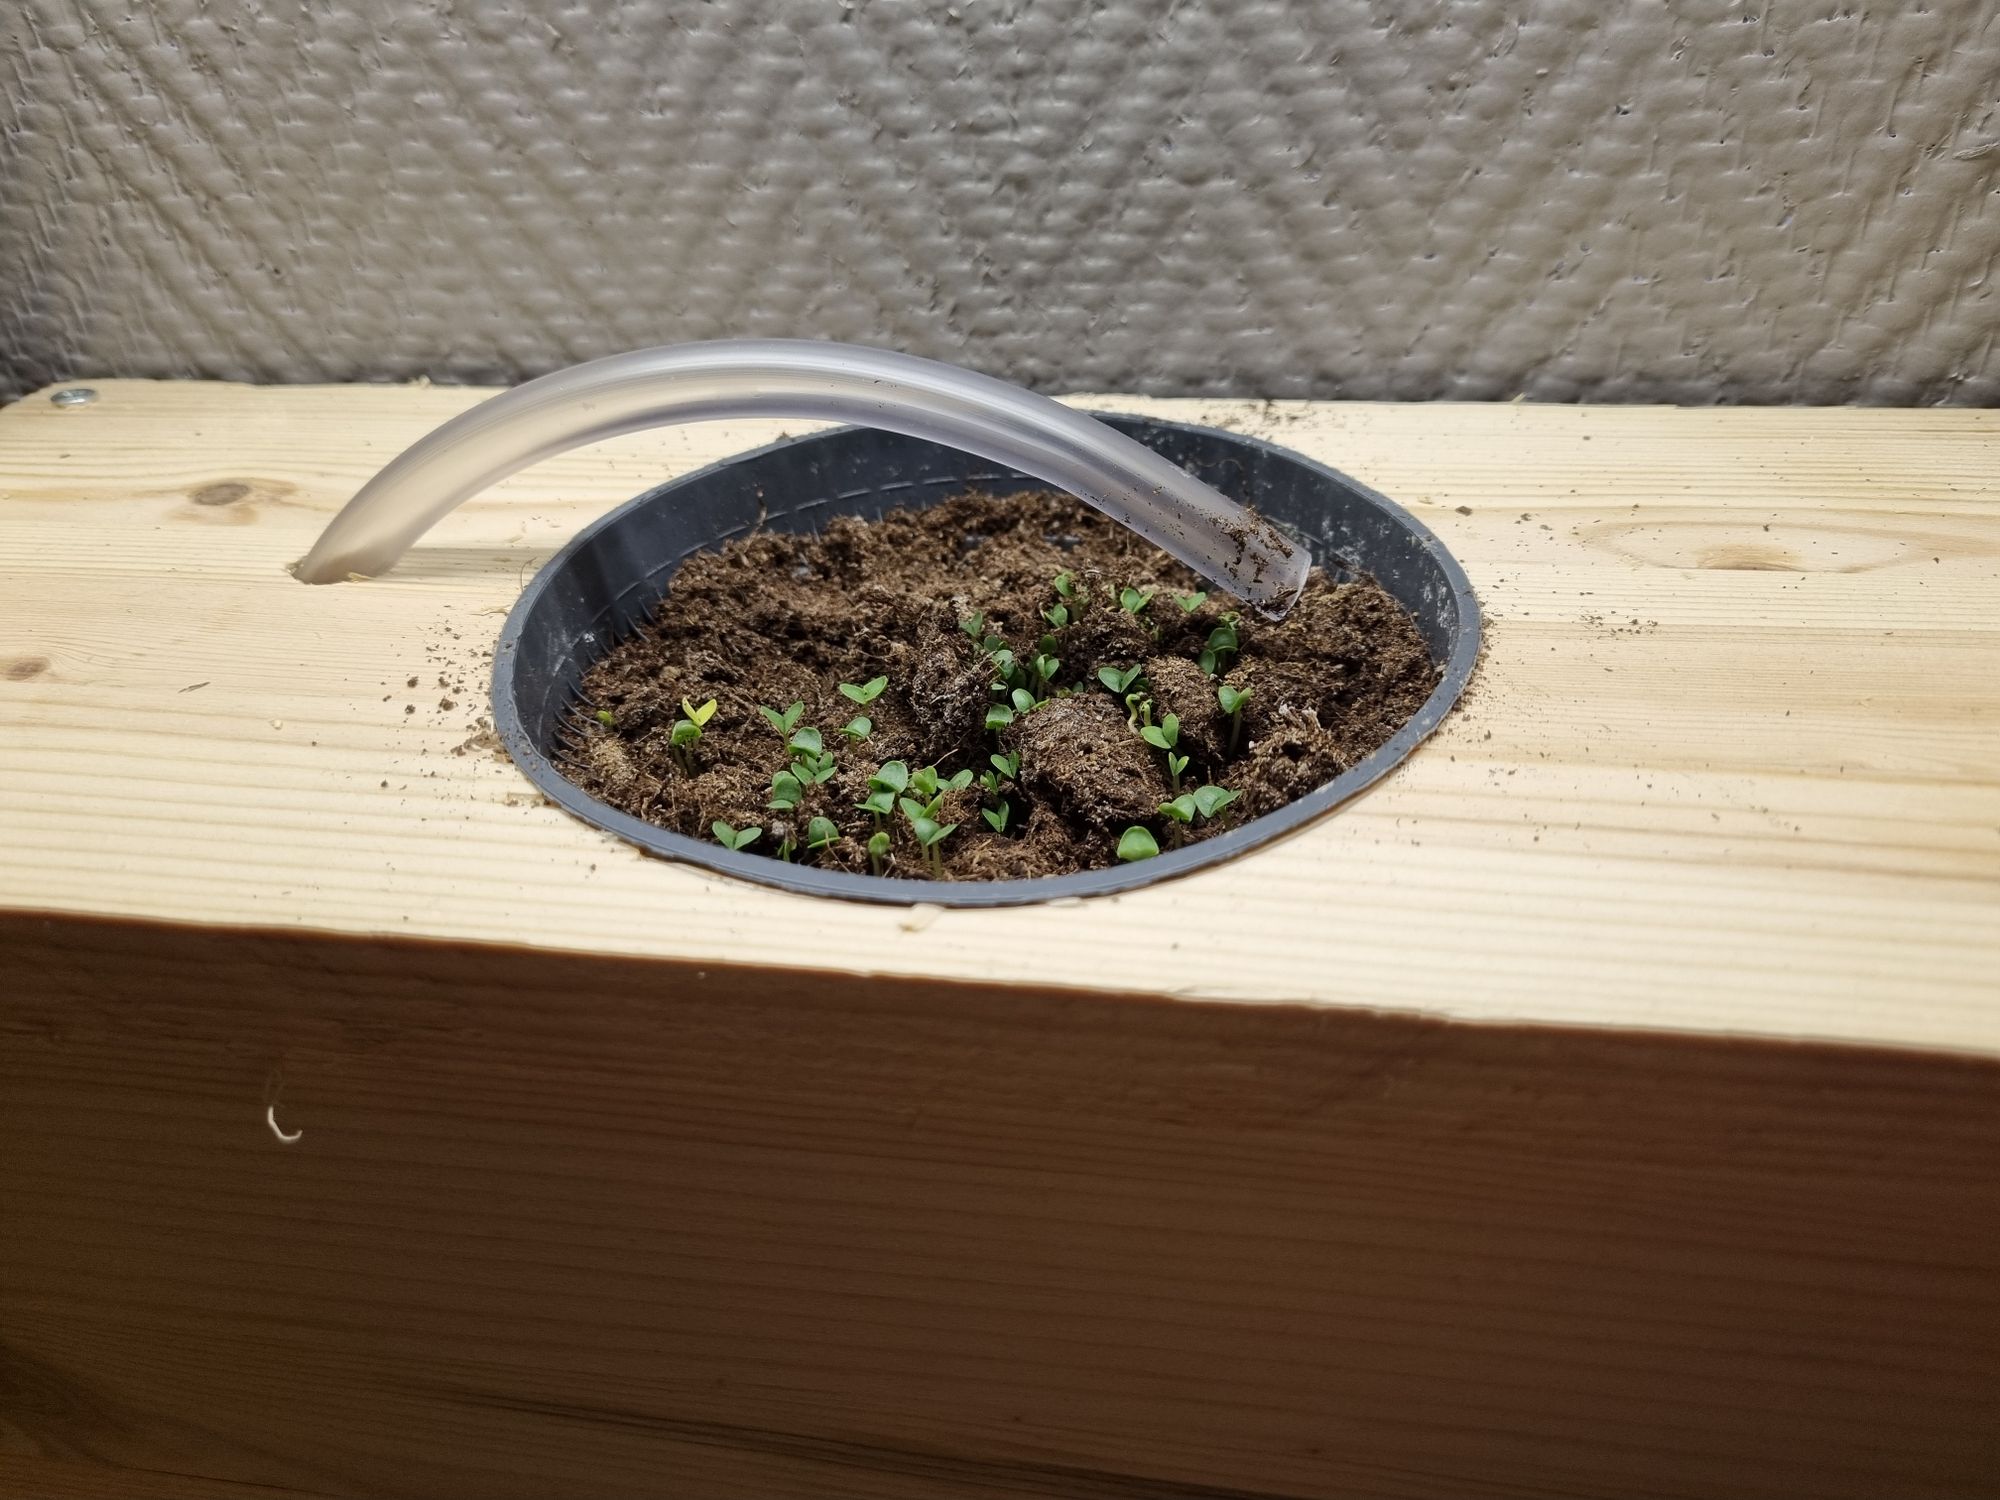
After that, fill the pots with leca in the bottom and soil on top. Plant the seeds, fill up the water container and turn on the system!

When everything is assembled it should look something like this.
Final thoughts
This project was fun! Although the build is simple enough, I've waited a long time for orders after realizing that I need some extra parts when trying to build something. If I were to do something different in this project, I would probably not have connected the lights to a power relay and always have the lights on. Turns out the lights don't produce as much heat as I first anticipated. As a result, the lights are pretty much on all the time.
Make sure that the water container is below the plant boxes or else the water container will work as a siphon and empty all water into an unfortunate plant pot. This happened to me...
It's exciting to see if this project will result in better herbs. The results should come in a couple of weeks. I'll make sure to update the post with pictures and thoughts by then.
Update: the basil is sprouting!